

What if you could skip the high-tech laboratory and grow gourmet mushrooms right on your kitchen counter with zero specialized equipment? It is completely normal to feel overwhelmed by the technical side of mycology, especially when you hear about sterile labs, bulky grow tents, and the constant fear of mold ruining your hard work. Many beginners get stuck trying to figure out the perfect ratio of substrate, which is the nutrient-rich material mushrooms eat, versus the grain they use for initial energy.
That is exactly why the all in one mushroom grow bag has become the gold standard for home growers in 2026. We promise that a successful, high-yield harvest does not require a degree in biology or a spare room for bulky equipment. This guide will help you master the simplest, most repeatable process for growing at home. You will gain the confidence to identify healthy growth and enjoy the satisfaction of your very first harvest. We are going to walk through everything from choosing your bag to using specialized supplements that boost your yield, making your journey into mycology supportive and easy.
Key Takeaways
- Discover how an all in one mushroom grow bag functions as a self-contained ecosystem, removing the need for bulky grow tents or complex laboratory gear.
- Learn the difference between grain spawn and bulk substrate so you can provide your mushrooms with the right balance of energy and hydration.
- Master the field capacity secret to keep your kit perfectly hydrated for a heavy, successful first harvest.
- Follow our five-minute inoculation guide to start your growing journey with confidence and ease.
- Develop the skills to identify healthy, vibrant mycelium and protect your project from common environmental setbacks.
What is an All-In-One Mushroom Grow Bag?
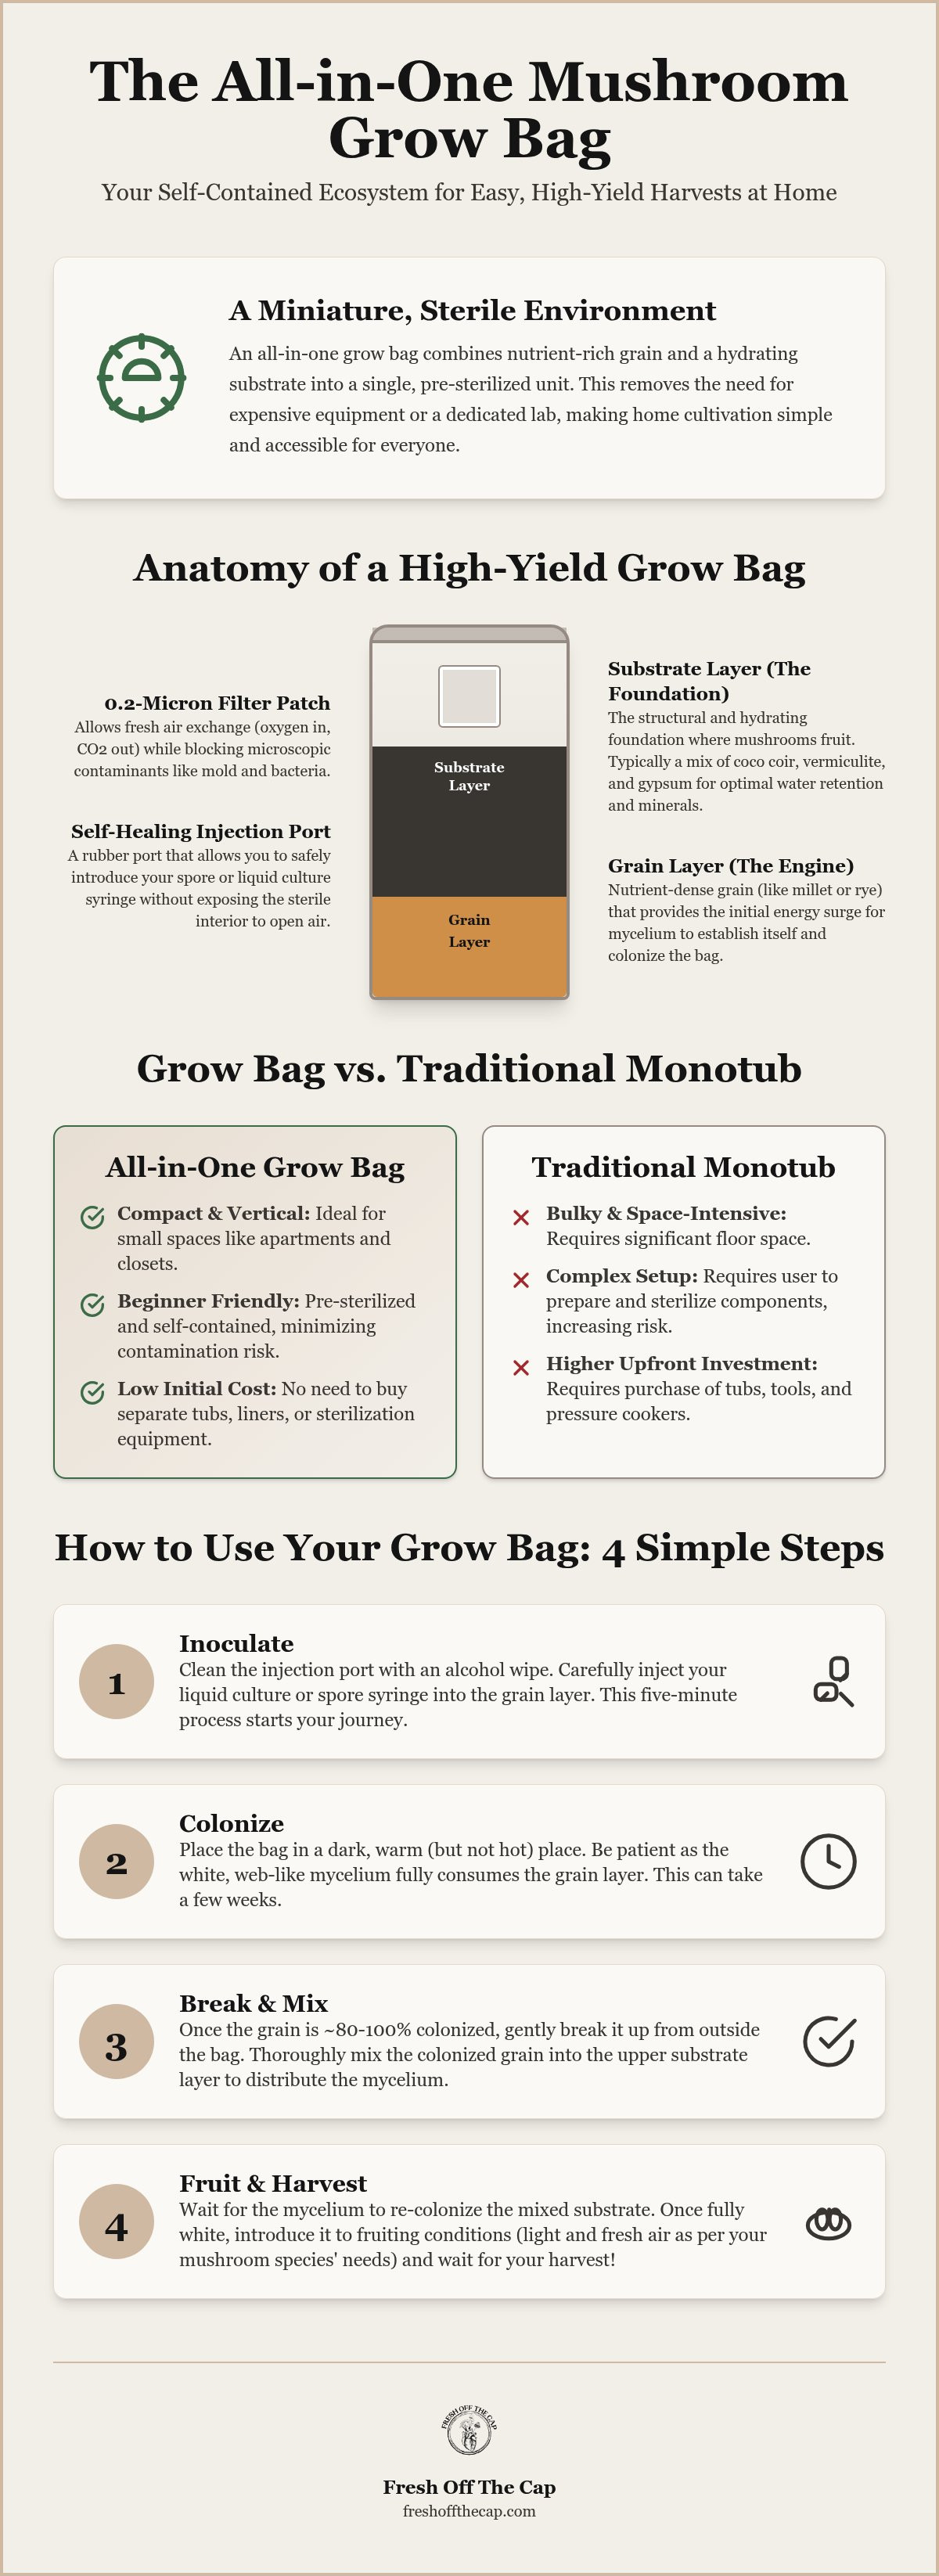
An all in one mushroom grow bag is a miniature, sterile environment designed to handle the heavy lifting of mycology for you. It contains two distinct layers: nutrient-rich grain spawn and a bulk substrate foundation. By combining these into a single, pre-sealed unit, we have removed the need for expensive pressure cookers or dedicated laboratory clean rooms. In 2026, as the global mushroom market is projected to reach over $22.11 billion, more people than ever are turning their kitchen corners into productive mini-farms. The bag "breathes" through a specialized 0.2-micron filter patch. This medical-grade material lets vital oxygen in while keeping microscopic contaminants out, ensuring your fungi stay healthy without any extra effort on your part.
The Science of the Self-Contained Ecosystem
Inside the bag, a dual-layer system mimics the natural forest floor in a highly controlled way. The bottom layer of grain provides the initial energy surge your mycelium needs to wake up and start growing. Once that energy is established, the mycelium moves into the bulk substrate layer to build the structure required for actual mushrooms. Since these bags arrive pre-sterilized, your success rate stays high because you aren't fighting off local mold or bacteria. We have also included a self-healing injection port. This small rubber port allows you to introduce your liquid culture or spores without ever exposing the sterile interior to open air, which is the biggest safety win for a beginner.
Grow Bags vs. Traditional Monotubs
Traditional methods often require large plastic tubs, known as monotubs, which take up significant floor space and require constant environmental monitoring. For apartment dwellers or those with limited space, the all in one mushroom grow bag is a total game-changer. It is a vertical solution that can sit comfortably on a bookshelf or in a small closet. When you look at the cost-benefit of buying individual components like tubs, liners, and sterilization tools, these kits are much more budget-friendly for your first few harvests. They offer a simple, streamlined entry point into the hobby without the bulky commitment of traditional setups. Explore our beginner-friendly grow kits to see how easily you can start your own urban garden today.
Anatomy of a High-Yield Grow Bag
A high-quality all in one mushroom grow bag is more than just a plastic container. It is a carefully engineered environment where every layer has a specific job to do. To get a high-yield harvest, you need to understand how the "starter" and the "foundation" work together. Professional kits use heavy-duty, medical-grade plastic that can withstand high temperatures without warping. This ensures the professional seals remain airtight, which is your first line of defense against unwanted mold or bacteria. When these components are balanced correctly, you create a powerhouse for fungal growth.
The Grain Layer: The Engine of Growth
This bottom layer is where the life of your mushroom begins. We use specific grains like millet or rye because their small size and high surface area allow for much faster colonization. Grain spawn is the nutritional fuel for mycelium. When you introduce your liquid culture through the injection port, the grain acts as the initial home. It gives the mycelium a safe, nutrient-dense place to establish itself. Once the mycelium has "eaten" through this layer, it gains the energy needed to move upward and conquer the rest of the bag.
The Substrate Layer: The Fruiting Foundation
The top layer is the bulk substrate, which provides the physical structure and water your mushrooms need to produce fruit. Most high-quality bags use a blend of coco coir for structure, vermiculite for water retention, and gypsum for essential minerals. We often talk about "field capacity" as the magic word for success. This term describes the perfect level of hydration: the substrate is wet enough to support life but not so soggy that it drowns the mycelium.
Choosing the right substrate depends on the species you want to grow. Manure-based mixes are perfect for certain varieties, while wood-based bags are better for others like Lion's Mane or Oyster mushrooms. To truly maximize your harvest, look for bags that incorporate specialized supplements. These additives are the secret to high-yield harvests because they provide extra micronutrients that standard coir lacks. If you are ready to start your own project, you can browse our artisanal grow kits to find a professionally balanced bag that fits your needs.
How to Use Your Grow Bag: A Step-by-Step Guide
Using an all in one mushroom grow bag is a straightforward process that rewards patience and attention to detail. You don't need a professional laboratory to succeed. A clean kitchen table or a quiet corner of your home works perfectly. The goal is to create a stable environment where your fungi can thrive without competition. By following a few simple steps, you can transform a bag of grain and substrate into a flourishing harvest in just a few weeks.
Inoculation Best Practices
The first active step is inoculation, which is the process of introducing mushroom spores or liquid culture into the bag. Hygiene during inoculation is the most important step for ensuring a healthy harvest. Before you begin, clean your workspace and the self-healing injection port on the bag. When using a liquid culture syringe, which is a tool containing live mushroom tissue in a nutrient solution, aim for a dosage of about 3 to 5cc per bag. More liquid isn't always better; adding too much fluid can throw off the moisture balance and stall growth. Insert the needle through the port, inject the culture, and your 5-minute window of work is complete.
Incubation and the Break and Shake
Once you have introduced the culture, your bag needs a dark, warm spot to begin the incubation phase. Most common species thrive in a "tropical" environment with temperature ranges between 72 and 78°F. During this time, the mycelium will begin to consume the grain, turning it from brown to a vibrant, healthy white. Keep the bag in a spot with consistent temperatures to avoid stressing the growth.
The "Break and Shake" is a critical technique for doubling colonization speed. You should identify the 20-30% colonization milestone, which looks like a solid white block covering nearly a third of the grain layer. At this point, gently "massage" the bag to break up the colonized grain and mix it thoroughly with the substrate above. Be careful to move the material without damaging the filter patch or the professional seals. This process distributes the mycelium throughout the entire all in one mushroom grow bag, creating hundreds of new growth points that lead to a faster harvest. Ready to start your first batch? Get your artisanal grow kit here and put these steps into practice.
Troubleshooting and Maximizing Your Harvest
Even with the streamlined design of an all in one mushroom grow bag, your role as a grower involves observing the life inside. Learning to distinguish between normal growth and potential issues is the final skill you need for long-term success. Unlike automated systems that claim to remove all human interaction, we believe that understanding your bag's health builds true confidence. By watching the transformation from grain to fruit, you become a partner in the process rather than just a bystander.
Mold vs. Mycelium: A Beginner Guide
The most common fear for new growers is identifying "the green monster," otherwise known as Trichoderma. This contaminant often starts white but quickly turns a tell-tale forest green. Mycelium is ropey and white, whereas mold is often dusty. You might also notice blue spots on your mycelium. Don't panic; this is usually just "bruising" caused by handling the bag or a slight change in moisture, and it is completely harmless. If you're still unsure, use the smell test. A healthy bag should smell earthy and like fresh mushrooms. If you detect a sour, sweet, or rotten odor, it's a sign that bacteria or mold has taken hold.
Harvesting and the Second Flush
Knowing exactly when to pick your mushrooms is vital for peak quality. We use the "Veil Rule" as our guide. You should harvest just as the thin membrane under the mushroom cap, called the veil, begins to stretch or tear. This is the moment when the mushroom has reached its maximum size but hasn't yet dropped its spores, which can make the bag messy. When you're ready, use a gentle twist-and-pull motion to remove the cluster without tearing up the substrate foundation.
The beauty of the Fresh Off The Cap artisanal kits is that they're designed for multiple flushes. Once you've harvested your first crop, you can rehydrate the substrate using the "dunking" method. Simply add a small amount of filtered water to the bag and let it sit for several hours before draining. This resets the ecosystem for a second harvest. High-quality ingredients and specialized supplements ensure your all in one mushroom grow bag has enough energy left for these subsequent growth cycles. If you're ready to try a different species, shop gourmet kits for your next grow and keep the momentum going.
Start Your Mycology Journey Today
Growing your own mushrooms no longer requires a professional lab or a massive investment in equipment. By using an all in one mushroom grow bag, you have a self-contained ecosystem that handles the complex biology for you. You now know how to identify healthy, ropey mycelium and when to use the "Break and Shake" method to speed up your colonization. These simple techniques, combined with the "Veil Rule" for harvesting, ensure you get the highest quality flushes from your very first try.
If you're ready to move from reading to growing, we're here to support you every step of the way. Our artisanal kits feature sterile substrates and high-nutrient supplements to guarantee your fungi have the fuel they need. We even offer expert-led group classes if you want a more hands-on learning experience. Start your home mycology journey with a Fresh Off The Cap All-In-One Kit today. You have the knowledge and the tools; now it's time to watch your first harvest flourish.
Frequently Asked Questions
How long does an all-in-one mushroom grow bag take from start to finish?
Most growers see a complete harvest within 4 to 8 weeks. The exact timing depends on the mushroom species and your room temperature. Colonization typically takes 2 to 4 weeks, while the fruiting stage adds another 2 to 4 weeks. You can often speed up this process by using the "Break and Shake" technique once the grain layer is about 30% white with mycelium growth.
Can I grow any mushroom species in an all-in-one bag?
You can grow a wide variety of gourmet and medicinal species, but you must match the mushroom to the correct substrate. Manure-loving species require a manure-based all in one mushroom grow bag, while wood-lovers like Lion's Mane or Oyster mushrooms need a wood-based blend. We provide artisanal kits specifically balanced for these different biological needs to ensure your chosen species has the right foundation to thrive.
What is the best temperature for a mushroom grow bag during colonization?
Maintaining a steady temperature between 72 and 78°F is ideal for most species during the colonization phase. If the environment is too cold, the mycelium will grow very slowly, which gives competing mold a chance to take hold. If it is too hot, you risk encouraging bacterial growth. Keeping your bag in a consistent, draft-free spot helps the self-contained ecosystem stay within this productive range.
How much yield can I expect from a 5lb grow bag?
You can generally expect a total yield of 1 to 2 pounds of fresh mushrooms across multiple flushes. The first flush is usually the largest, with subsequent harvests getting smaller as the nutrients are used up. We include specialized mushroom supplements in our kits to help you maximize these yields. Your final volume will also depend on the genetics of your culture and how well you maintain humidity.
Why is my mushroom grow bag not pinning or fruiting?
A lack of fresh air exchange or low humidity levels are the most common reasons for a delay in fruiting. Pinning, which is the formation of tiny baby mushrooms, requires a trigger like increased oxygen or a slight drop in temperature. Ensure your filter patch is not blocked and that the bag has sufficient moisture. If the substrate looks dry, you might need to use the rehydration dunking method.
What should I do if my grow bag gets green mold?
If you see forest-green patches, you should remove the all in one mushroom grow bag from your living space immediately. This is likely Trichoderma, a fast-moving mold that can spread spores to your entire home. Since the bag is sealed, the contamination is contained, but you should not open it. It is best to start fresh with a new sterile kit and ensure your inoculation workspace is as clean as possible.

Article by
Joseph Rodriguez
Joseph is the founder of Fresh Off The Cap and a self-taught mycologist with over a decade of experience in mushroom cultivation and research. Formerly a music teacher, Joe transitioned his passion for harmony into the fungi kingdom, focusing on sharing knowledge and culture through mushroom wellness. His expertise led him to guest lecture for the Psychedelic Anthropology course at CU Denver. To deepen his practice, Joe studied under Dr. Joe Tafur and completed The River Course, focusing on an integrative approach to psychedelic therapies and sacred plant medicine. Today, he channels this holistic framework into expanding fungal literacy and community wellness.
Disclaimer
The information provided in this article is for educational and informational purposes only. It is not intended as medical advice, diagnosis, or treatment. Please consult with a qualified healthcare professional before making any changes to your diet, supplement regimen, or lifestyle routines.
